In most regions of Russia, vegetables and greens are best grown in a greenhouse.
Tomatoes, bell peppers, eggplants and cucumbers are excellent fruits, if they create a comfortable microclimate.
The greenhouse from a bar of a tree optimum is suitable for these purposes.
Why from wood?
There are wooden structures several important benefits and in particular:
- low cost - The skeleton of this material, made with your own hands, is cheaper than a ready-made version of a galvanized profile;
- durability - the design serves at least 5-7 years, and in regions with a temperate climate three times longer;
- environmental friendliness - wood favorably affects the microclimate inside the greenhouse and does not emit harmful substances into the atmosphere.
What to cover?

We did not mention such wood frame advantages as reliability and stability, i.e. the ability to withstand any coating, from light agrofilm to fairly heavy glass.
There are many different options for covering greenhouses on the basis of a wooden frame.
Each type of coverage has its pros and cons, we will focus on them in more detail.
Polyethylene film
Pros:
- availability - the product can be found in any market and in a building materials store;
- low cost.
Minuses:
- short term use;
- insufficient permeability to sunlight;
- low strength (quickly torn);
- poor insulation performance.
Glass
Pros:
- excellent transparency;
- resistance to sudden changes in temperature;
- good thermal insulation;
- resistance to aggressive media;
- ease of care.
Minuses:
- certain complexity of the glazing process;
- significant weight and, accordingly, increased demands on the frame;
- fragility and helplessness in front of strong wind and hail;
- insufficient protection against UF radiation.
Polycarbonate
Pros:
- ease;
- strength;
- the ability to pass up to 80% of solar radiation;
- versatility (it can be bent and covered with frames of any shape).
Minuses:
- rather complicated installation;
- in hot weather it is very hot;
- low-quality polycarbonate after 1-1.5 years of operation becomes brittle, like glass.
IMPORTANT! The choice of covering materials depends on the region of residence, the types of vegetables grown, the preferences of the owner and his budget.
Choice of timber
 In the nearest carpentry workshop you can purchase a wooden bar for the construction of the greenhouse frame.
Better if he will industrial woodFor example, pine or larch.
Expensive woods (oak, beech) are heavy in processing, are expensive, and they serve not much more than coniferous ones.
Even cheap wood can be approximated by its characteristics to the ideal, if properly selected and prepared.
Criteria for selection of timber:
- lack of cracks, chips, large knots, and also signs of rot;
- humidity indicators not higher than 22%;
- perfect geometry (the bar should be flat and straight).
At observance of these requirements the framework of the greenhouse will turn out strong and steady against differences of temperatures. Beam for the base should have dimensions of 100 x 100 mm; for racks 50 x 50 mm.
IMPORTANT! all wooden elements of the greenhouse must be carefully cut, treated with an antiseptic composition in order to avoid rotting and the appearance of insects. Before assembling the frame, they can be soaked with linseed, so that they look beautiful. Ideally, it is desirable to paint the finished wooden structure.
Choosing a place
One of the main questions that gardeners are asking is - where exactly to locate the greenhouse. The best option is an unshadowed place, which is located at a sufficient distance from suburban buildings and large trees. In other words, it is impossible to allow the shadow to fall on the structure even for a single hour per day, since this will negatively affect the yield of vegetables.
IMPORTANT! the door should be located on the leeward side (not on the north and not on the one from which the wind most often blows).
Greenhouse size
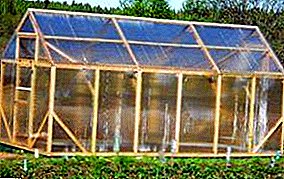
It is time to decide what we will build. So, it will be a stationary greenhouse with the following parameters:
- dimensions in terms of - 2 x 5.4 m; wall height - 1.5 m;
- roof truss, 2-pitched;
- tape foundation, reinforced;
- film coating.
Design calculated for use in the warm season. Sizes selected based on the width of the polyethylene film sleeve - 3m. When covering the finished frame, the film does not have to be cut and adjusted.
Foundation device
Question: how to build a greenhouse with your own hands from wood? not so simple. It is necessary to solve many intermediate tasks - from the location of the greenhouse to the choice of covering material.
 Which foundation to choose, concrete or brick, arranged in the manner of columnar, everyone decides for himself.
In our case, this is a monolithic strip foundation.
A small trench of 55-60 cm in depth is dug under it, along the perimeter of the future structure, into which concrete M 200 or 250 is poured.
Using formwork, you must raise the tape above ground level to a height of 25-30 cm.
Foundation can and should be reinforced to increase its strength characteristics and protection against sinking. Should also take care of waterproofing, so that later the construction could be used not only with a wooden frame and a film coating, but also, for example, with a metal frame and a polycarbonate coating.
Wooden greenhouse do it yourself
Wood is a material traditional for Russia, and the ability to work with it in our men’s blood. Therefore, problems in the manufacture of the frame should arise. Here is what it should look like:
Frame layout
Photos of the phased construction of a wooden greenhouse from a bar with their own hands are presented later in the article.

(Fig. 1 Scheme of the frame of the greenhouse of wood)
The design has a trapezoidal shape (the most common and simplest implementation of the arch form). Pay attention: in the figure at the greenhouse there are two ends, in one of which an entrance door will be installed later. To this end, the top board of the end wall will be cut. Here's what the frame looks like when assembled at the dacha:
Construction of a greenhouse on the site

(Fig. 1a Building a greenhouse on the site)
Step 1: Fastening the carrier beam to the foundation
Before the thick bars are attached to the foundation as a base for the frame, we recommend to put a rabbit under the future greenhouse of a fine-meshed net to protect against moles and other rodents. A little mouse can make a big stir and scare you with its sudden appearance. A few words about the carrying bar - it should be a little wider than the one from which the frame itself will be made. He also needs pre-treat with antiseptic formulations. Fixing it to the foundation is done with metal corners (they are installed at the filling stage), anchor bolts, and fittings.
IMPORTANT! the base must be made of solid timber, and not of segments connected to each other. On this depends the stability of the future design.
Step 2: Making the wall
After the wooden base is attached to the foundation, proceed to the assembly of the frame and begin with building the wall. This is quite a laborious process.especially for those who do it for the first time. However, if the material is of high quality and the measurements are accurate, the installation is simple.
Pre-assembled greenhouse wall

(Fig. 2 The wall of the greenhouse assembled)
The figure in front of you is a diagram of the inner wall assembly (dimensions 5.4 x 1.5 m). As you can see, for ease of assembly were selected grooves. With them it is not only more convenient, but also safer, since they increase the stability of the finished frame to wind loads. For fixing walls to other frame elements (rafters, vents, ceiling lags), self-tapping screws, a metal profile, a corner, clamps will be required. The number of walls with the above parameters is two.
Step 3: Install the rafter system
In the manufacture truss system can not do without slots. Moreover, they will need more than for the walls. Nevertheless, you should try to do them all so that the roof plane is flat and the wind load on the film coating is the smallest.
Now we decide on the length of the truss foot. If people of medium height will use the greenhouse, its length should be 1.27 m. If you are tall, increase the length of the rafter leg to 1.35 cm.
Such exact numbers and strict restrictions can be surprising. In fact, everything is simple: the width of the polyethylene film sleeve is 3 m, i.e. 6 m in unfolded form. Therefore, the sum of the lengths of two truss legs and two racks should be about 5.8 m. This will make it possible to do with a 6 x 6 m covering film, without residues and waste.
On one side of each pair of rafters a wooden corner (fastener) and a bolt are fastened. The number of rafters corresponds to the number of racks. This is how a truss pair looks like:
Rafters

(Fig. 3 Rafters)
Step 4: Install the skate and wind boards
The rafter system is considered complete and acquires a given strength only after the installation of wind boards and roof ridge. They are attached at the very end and must be made of solid timber (as well as bars under the frame). In the diagram below, these three boards are highlighted in dark brown:
Fastening wind boards made from solid material

(Fig. 4 Fastening wind boards from solid material)
IMPORTANT! The ridge and wind boards need not only to be positioned correctly, but also to be thoroughly processed (to touch and sand) so that the adjacent plastic film does not tear on the poorly prepared surface.
Step 5: Door and Vane Installation
Since our greenhouse is small, only 5.4 m in length, one entrance door (at the end) and one window leaf (at the same or opposite end) are sufficient for it.
a door

(Fig. 5 Door and window leaf)
You can see a very detailed and solid construction of a greenhouse from a wooden bar in this video:
Not to mention another advantage of the wooden frame with the roof truss system. The design allows you not to spend time and money on the production of tapestries, and tie up the plants directly to the rafters.
Without greenhouse difficult to get a good harvest heat-loving vegetables. Despite the fact that on sale today you can find a rich selection of ready-made sets of greenhouses and hotbeds, interest in creating their own hands is growing from year to year.