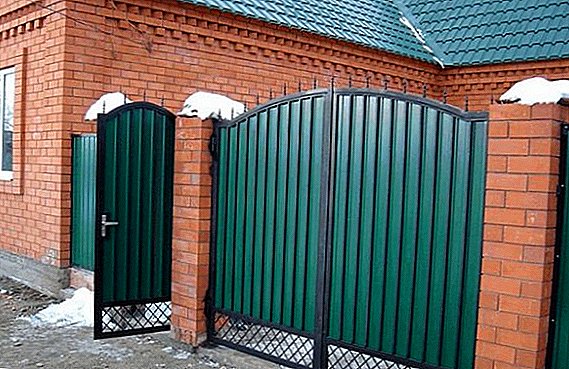
Now designs from the pro-thinned-out sheet (professional flooring) are widely used in construction. This material has gained deserved popularity due to ease of installation and high performance. One of the areas of its application is the creation of fences. It is quite capable of independently making one of the elements of the fence, namely the gate, which will be discussed in this publication.
Advantages of a professional flooring gate
The advantages of the construction of the profiled sheeting are due to the advantages of the material itself, namely:
- they withstand mechanical loads well;
- with high strength, they are quite light;
- The composition of galvanized steel with polymer coating perfectly protects against corrosion, which ensures their long service life;
- a wide range of colors is available;
- material has an attractive appearance;
- good value for money.
Did you know? It is believed that the inventor of the profiled sheet is the famous British engineer Henry Robinson Palmer. The invention took place in the 20s of the XIX century.

Decking
There are many types of this material. They may vary in the following parameters:
- by type of corrugation - trapezoid or wavy;
- the height of the corrugations;
- the thickness of the material (0.3 ... .1 mm);
- by the type of protective coating - the steel sheet may be coated with zinc or alumino-zinc, the polymer coating may also differ (plastisol, polyester, etc.);
- profile width;
- the width of the sheet.
We advise you to read about how to make the fence itself from the netting of the chain-link, shtaketnik, gabions, as well as how to make brick and wicker fences.
A zinc coating is a cheaper option, and a zinc alumina is more stable in an aggressive environment, such as sea air or car exhaust. Zinc and aluminum are a part of alyumotsinka, silicon is used as a binder.  As for the polymer coatings, the organic polymer Plastizol provides increased strength, good protection against scratches. However, it eventually loses its color, collapses under the influence of ultraviolet radiation and may suffer from sudden changes in temperature.
It will be useful for you to read about what materials are for the fence, and which ones are better.
Much more common is the polyester coating, which is free from all these disadvantages. Polymer PVDF (polydifluorionad), in addition to ensuring the resistance of sheets to corrosion resistance, retains its color better than other materials.
Did you know? The highest gate in the world is the gate of the building of the vertical assembly of rockets, which is located in the space center to them. Kennedy NASA. Their height is 139 meters. It takes 45 minutes to open them.

Profile marks are marked as follows:
- "WITH" - wall, usually less durable than other types, but light and cheap;
- "NS" - durable universal material;
- "H" - heavy bearing profiled high strength, unsuitable for the gate;
- "MP" - universal profiled, often used for roofing and decoration.
Consider some brands of profiled sheet in more detail:
- C8 profile has a wavy corrugation. It is less durable compared to other brands, but cheap. The thickness can be from 0.5 to 0.7 mm, the total width of the sheet is 1.2 m, the length varies from 0.5 to 12 m, the profile height is 8 mm.

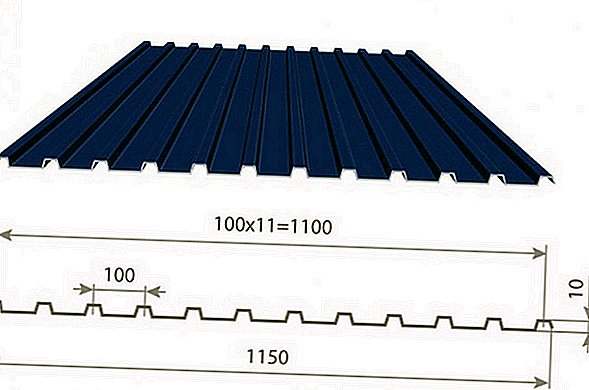
- C10 profile possesses trapezoid corrugation. He also does not have the strength. Its thickness is 0.4 ... 0.8 mm, total width - 1.15 m, length - from 0.5 to 12 m, profile height 10 mm.
- C18 profile may be of two types: ribbed and wavy. In the latter case, it is labeled as C18 (wave). Its thickness is 0.4 ... 0.8 mm, the total width of the sheet is 1.023 m, the length varies from 0.5 to 12 m, the profile height is 18 mm.

- Profile C21 is ribbed trapezoidal shape. This brand is much stronger than those described above. Thickness is 0.4 ... 0.8 mm, total width of the sheet is 1.051 m, length 0.5 ... 12 m, height - 21 mm.

We recommend to read about how to build a formwork for the foundation of the fence.
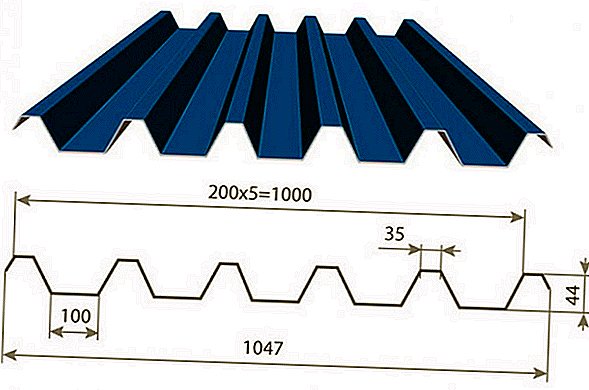
- Profile C44 It has trapezoid corrugation and is characterized by increased rigidity and the ability to withstand considerable loads. Profile thickness - 0.5 ... 0.9 mm, total width - 1.047 m, length - 0.5 ... 13.5 m, height - 44 mm.
- HC35 profile trapezoid, but with additional edges. It is particularly durable. Its thickness is 0.5 ... 0.9 mm, the total width of the sheet is 1.06 m, the length varies from 0.5 to 12 m, the profile height is 35 mm.


Materials
For the manufacture of the gate will need the following materials:
- a professional flooring (as a rule, the same brand from which the fence is made is taken);
- square tube for support columns, usually using 80x80 mm with a wall of 3 mm or 100x100 mm with a wall of 4 mm;
- rectangular tube for the frame, using 40x20 mm or 60x40 mm;
- for bridges, you can use the same pipe as for the frame, or you can take a smaller section, for example, 20x20 mm;
- corner (if necessary);
- screws or rivets;
- cement;
- paint and primer.

Types of gates
There are several types of gate design: swing, sliding, sliding, garage, swing-lift. The most common recoil and swing, these designs are the most practical. Tell about them in more detail.
Recoiling
This type of gate has one leaf, which does not swing open, but moves off to the side. Thus, the territory of the monastery is rationally used. In addition, this type of gate can be made very wide, up to a width of 12 meters, which corresponds to the maximum length of a standard profiled sheet.
Another advantage is the convenience of operation in the winter period, because at this time of the year it is not necessary to clear the snow just to be able to open the gate.  Among the shortcomings can be noted the relatively complex design, the need to purchase special components for the assembly of such gates, and ultimately the greater cost of construction of this type.
You may be interested in reading about how to make a gable and hipped roof, how to make a mansard roof, how to cover the roof with ondulin and metal tile, how to install a visor on the porch, how to make a pavement at home, as well as how to warm the basement of the house outside.
Swing
This type of gate has two doors that swing open to the outside or inside of the courtyard. They are characterized by simplicity of design and moderate cost. The disadvantage is the need to alternately open the sash, as well as to clear the area around the gate from the snow in winter in order to be able to open them. 
Sliding Gate Assembly Process
For the manufacture of such gates will need the help of at least one person. In addition to the above materials, you will need:
- guide rail, whose length is 1.6 width of the opening;
- two bearing roller bearings with adjusting supports;
- two traps to prevent rocking of the structure;
- knurling roller, reducing noise when opening / closing the gate;
- channel 20 cm wide and fittings 10-14 mm for the foundation.
Gate constructions and tools
When drawing up a drawing, the main design parameters are calculated according to the following rules:
- the width of the door panel with a counterweight width is equal to the width of the opening multiplied by 1.6;
- the width of the counterweight is equal to the width of the opening multiplied by 0.5;
- the width of the panel is equal to the width of the opening plus twice the width of the supporting pillars;
- The optimal height of the gate exceeds the height of the fence by 10 cm, but should not exceed 2 meters.
Based on the obtained dimensions of the panel frame and the counterweight, the dimensions of the jumpers are calculated. All calculated dimensions of the opening, panel, counterweight, lintels and door heights are displayed on the drawing.
Important! The width of the opening is determined on the basis of the dimensions of the vehicle that will pass through the gate, and the layout of the settlement. So, if the road that approaches the gate is narrow, then it is desirable to make the opening wider.

From the tools you will need:
- scissors for metal;
- electric drill;
- Bulgarian;
- welding machine;
- bayonet spade (can be supplemented with a garden bore of suitable diameter, it is more convenient for them to make a hole for supports);
- level;
- roulette.
Bookmark the pillars
It is recommended to use square steel pipes as a support column, but other elements can also be used: channel bars, concrete columns, oak bars.
Important! If the depth of the pit under the support does not exceed the depth of freezing of the soil, in the spring the support can simply be pushed out of the ground, and it will fall.Video: bookmark pillars To install the support column, you must perform the following steps:
- Dig a hole, the depth of which exceeds the depth of soil freezing (for central Russia, the soil can freeze by 1.0 ... 1.2 m).
- The bottom of the pit is filled with a mixture of sand and rubble, a layer of backfill 15 ... 30 cm.
- Install the prepared support.
- To concrete the support, controlling the strictly vertical position of the support with the help of a level, the time of hardening of the concrete is at least three days.
Foundation laying
To create a foundation for roller bearings and a guide beam, you need to perform the following actions:
- Dig a U-shaped pit. The length of the pit coincides with the dimensions of the counterweight, the width with the width of the channel, the depth of the “crossbar” is 50 cm, the depth of the “legs” is 170 cm (below the depth of soil freezing), the width of the legs is 40 cm (the depth is not specified ). The bottom of the pit is covered with sand, the height of the sand pillow is 10 cm.
- Cut the channel under the length of the pit.
- Cut rebar and weld to the channel in the form of legs. Strengthen these “legs” by welding the reinforcement struts.
- The construction of the channel and reinforcement to be lowered into the pit, the channel should be flush with the surface.
- Pit pour concrete, the foundation seizes about a week.

Learn more about how to install a water heater, septic tank, air conditioning system, how to make plumbing from a well, how to build a cellar in the garage, how to get rid of groundwater in the basement, how to make lighting for the house, as well as how to make a stove and Dutch burgundy bake.
Frame making
The procedure for making the frame is as follows:
- According to the drawing, the grinder cuts the pipes, the joints of the external structural elements are cut at an angle of 45˚.
- The cut elements are cleaned, primed and painted.
- Welded outer frame.
- The internal frame with jumpers is welded, there should not be a solid seam, the pipes of the internal frame are simply welded with short centimeter seams every half a centimeter.
- The guide beam is bolted to the bottom of the gate.

Installation of a frame and professional flooring
To install the frame and sheathe it with a professional flooring, you must perform the following steps:
- Install roller bearings on the foundation (channel), they should be separated to the maximum distance from each other. The supports can not be fixed directly to the foundation, they are installed on the adjusting stand.
- Put the door leaf on roller bearings and check the level of distortions.
- In the absence of distortions roller bearings finally fixed.
- From the side of the counterweight, install a cap.
- From the opposite edge to install the end (support) roller.
- Install traps (upper and lower).
- Check the performance of the structure.
- Frame sheathing profiled, as a fastener to use screws or rivets (trim can be made before installing the frame).
Fittings installation
Additional elements act as accessories: latches of the door curtain, surveillance cameras, alarm systems, lighting, etc. All this can be set at will after the assembly of the gate.
Assembly technology and installation of swing gates
The design of swing gates is much simpler than sliding gates, respectively, and the assembly technology is also simpler. Consider this process in detail. From materials other than those listed in the "Materials" section, you will need hinges, sash locks, bolts or a lock.
Drawing and Tools
On the drawing of the swing gates, the width and height of the shutters, the configuration of the frame and the dimensions of its elements, the installation positions of the loops, the dimensions of the supporting posts should be displayed.  It is important to determine, taking into account local conditions, where the doors will swing open - out or in. Bottom, between the ground and the lower edge of the leaflets, a gap (15-30 cm) should be provided for the gate to function in winter.
From the tools you need these:
- scissors for metal;
- electric drill;
- Bulgarian;
- welding machine;
- spade (can be replaced with a garden bore of a suitable diameter);
- level;
- roulette.
We advise you to read about how to properly glue the baseboard, how to make a warm floor, how to put the socket and the switch, how to remove the paint from the walls, whitewash from the ceiling, how to glue the wallpaper, how to sheathe the wall with plasterboard, and how to properly whiten the ceiling.

Determine the size of the valves
As a rule, the width of the opening is determined on the basis of the width of your own car, and another meter is added to this value. Sash should completely block the opening, on the basis of this, their size is determined.
Usually the width of the opening is 4.5-5 meters. If the road in front of the house is too narrow, it is worth making the opening wider, this will facilitate the arrival and departure of the car. The height of the valves is usually 2-2.5 meters.
Frame
To make a frame, the following is done:
- According to the drawing, pipe blanks are cut. The joints of external elements are recommended to be cut at an angle of 45˚.
- Billets are cleaned of rust.
- The frame is welded and jumpers are welded (transverse or diagonal, depending on the chosen construction).
- Welds are cleaned, the structure is primed and painted.
Installation of pillars
As supports usually use shaped square tubes or channel bars. To install the support column, you need to perform a number of actions, namely:
- Dig (or drill a hole) a hole, the depth of which exceeds the depth of soil freezing.
- The bottom of the pit is filled with a mixture of sand and rubble, the thickness of the filling is 15-30 cm.
- Install the prepared support.
- Concrete support, controlling its strictly vertical position with the help of level. The hardening time of the concrete is approximately three days.

Setting loops
For swing gates use garage hinges. The procedure for installing them is as follows:
- First, the loops are welded to the supporting pillars, then to the outer side of the frame. If the flaps are too big and heavy, you will need three loops per flap, in ordinary cases they cost two loops. That part of the loop, that with the pin, is welded to the support.
- After welding the hinges on the supports, they hang the flaps and carry out a design test.
- If the test results are positive, the weld area is cleaned, all ground and painted.
Installation of a professional flooring
The profiled sheet is attached to the frame with screws or rivets, and the sheets need to be fixed both to the elements of the outer contour of the frame and to the jumpers.  Fasteners can be pre-painted to match the color of the gate. If desired, you can sheathe sash profiled on both sides. In the process of installation will need to make cuts in the sheets under the loop.
Fittings installation
After the gate is installed, the fittings are installed. These are, as a rule, the lower clamps of the valves, constipations, locks (hinged, overhead, mortise). Additionally, you can install lighting elements, surveillance cameras, alarms, as well as a removable part of the valves, covering the lower clearance of the gate for the period of absence of snow.
As you can see, the installation of the gate of corrugated on its own - quite a real event. Of course, the installation of sliding gates can be a daunting task for a person with insufficient experience in the field of construction, but swing doors are quite simple in design and manufacturing technology. Installing a swing option is usually not difficult, even for beginners.
Reviews from the network